Preparing an aquarium for new fish requires choosing a stable location, rinsing substrate, cleaning decorations, installing filtration and heating equipment, conditioning tap water, and cycling the tank for 4-6 weeks until ammonia and nitrite reach zero. Skipping any of these steps risks introducing harmful chemicals, promoting disease, or stressing fish before they can acclimate.
This guide walks through every stage of aquarium preparation in order, from selecting the tank location to verifying the nitrogen cycle is complete.
Plan Before You Buy
Finalize your aquarium location, substrate, and equipment before purchasing fish. A fully cycled tank with stable water parameters prevents the most common cause of fish loss in new setups. Budget 5-6 weeks from initial setup to adding your first fish.
Choose and Prepare the Aquarium Location
Aquarium placement must be finalized before filling the tank with water. A filled aquarium weighs approximately 8-10 pounds per gallon, making relocation after setup impractical and dangerous — moving a stocked tank requires fully emptying it, which causes extreme stress to fish.
Location Requirements
- Sturdy, level surface capable of supporting the full weight of the tank
- Nearby electrical outlets for heater, filter, and lighting
- Away from windows and direct sunlight (prevents algae growth and temperature swings)
- Accessible from all sides for routine maintenance
- Visible location where you can enjoy the aquarium daily
Plan the tank layout in advance. Consider which direction the aquarium will face and how decorations will create depth, hiding spots, and swimming lanes for fish. For detailed placement guidance, see our guide on where to place a fish tank.
Choose a sturdy, level surface away from direct sunlight with easy access to electrical outlets.
Prepare Substrate: Sand, Gravel, and Soil
Substrate forms the foundation of any aquarium, supporting plant roots, housing beneficial bacteria, and influencing water chemistry. Choosing the right substrate and preparing it properly prevents cloudy water and chemical imbalances.
Sand Substrate Preparation
Filtration sand and river sand are both chemically inert and suitable for freshwater aquariums. Sand compacts more tightly than gravel, which limits water flow through undergravel filters but creates a smooth surface ideal for bottom-dwelling fish that sift through the substrate.
Rinse sand thoroughly before adding it to the tank. Move sand between two clean buckets, filling with water and pouring off the cloudy runoff. Repeat this process until the water runs completely clear — unwashed sand creates persistent cloudiness that can take days to settle. For more on sand options, see our sand for freshwater aquariums guide.
Gravel Selection and Preparation
Gravel is the most common freshwater aquarium substrate because water passes through it more easily than sand, improving biological filtration. A layer of approximately 2 inches (5 cm) provides an adequate filter bed, requiring about 2 pounds of gravel per gallon of tank capacity.
Choose gravel grain size appropriate to your fish species. Coarse gravel is unsuitable for fish that dig or sift through substrate, such as Corydoras catfish or loaches. Fine to medium gravel works for most community tanks.
Gravel Preparation Steps
- Rinse thoroughly even if labeled pre-washed — residual dust will cloud the water
- Continue rinsing in a bucket until water runs completely clear
- Test with vinegar to check for limestone content (see warning below)
- Soak overnight in aquarium disinfectant to eliminate parasites and bacteria
- Rinse again thoroughly before adding to the tank
Limestone Test
Drop vinegar on gravel samples before adding them to the tank. Fizzing indicates calcium carbonate (limestone), which dissolves over time and raises water hardness and pH. Avoid limestone-containing gravel when keeping soft-water species. Choose chemically inert substrates like granite or quartz gravel to prevent unexpected pH changes.
For planted aquariums, specialized substrates provide nutrients that plain gravel cannot. See our guide on the best substrate for planted tanks for options.
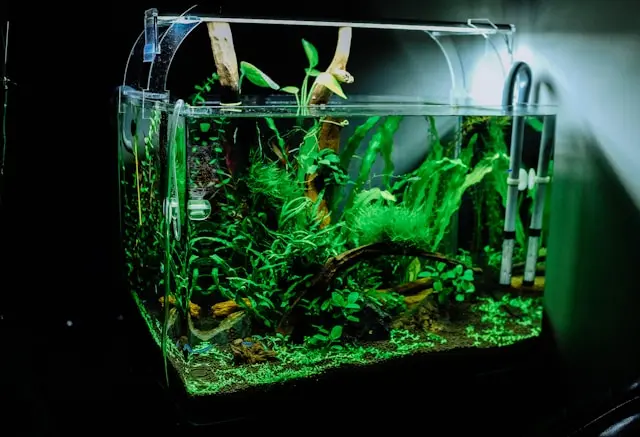
A well-prepared sand substrate provides a smooth, natural surface for bottom-dwelling fish and supports plant growth.
Prepare Rockwork, Bogwood, and Driftwood
Hardscape elements create the visual structure of an aquarium while serving practical purposes: shelter, territorial markers, spawning sites, and growing surfaces for plants. Every piece of rockwork and wood must be cleaned and tested before going into the tank.
Rockwork Preparation
Rocks provide egg-laying sites, territorial boundaries, and shelter for fish. Cichlids favor flat pieces of slate for spawning, while cave-dwelling species need stacked formations with openings. Rocks appear noticeably more colorful when submerged than when dry, so judge your selections in water.
Use chemically inert options like granite or slate to avoid altering water chemistry. Test any unknown rock with vinegar — fizzing means it contains limestone and will raise hardness over time, just like gravel.
Rock Preparation Steps
- Scrub each rock in a solution of aquarium disinfectant
- Rinse thoroughly in clean water after scrubbing
- Embed rocks firmly in substrate before filling the tank
- Use aquarium-safe silicone sealant to cement tall rock towers and prevent toppling
- Avoid excessive clustering in corners where restricted water flow causes mulm buildup
Rock Placement
Do not overload the tank with rockwork. Excessive rock reduces the substrate area available for undergravel filtration and restricts water circulation. Leave open swimming areas between rock formations.
Bogwood and Driftwood Preparation
Bogwood — wood that has been submerged in peaty, waterlogged conditions — creates natural aesthetics and serves as an excellent growing medium for plants like Java Fern. Bogwood is particularly suitable for soft, acidic water setups that replicate South American or Southeast Asian biotopes.
Bogwood contains tannin, a natural compound that leaches into aquarium water and turns it brownish-yellow. Tannin is harmless to fish but affects water clarity and appearance. Pre-soak bogwood in a separate bucket for several days, changing the water daily and scrubbing with a clean brush until tannin release slows significantly.
Driftwood requires the same cleaning and soaking process as bogwood. Boiling driftwood for 1-2 hours accelerates both tannin removal and disinfection. After boiling, soak driftwood in a separate bucket for several weeks until the piece becomes fully waterlogged and sinks on its own — driftwood that has not absorbed enough water will float persistently and resist staying in position.
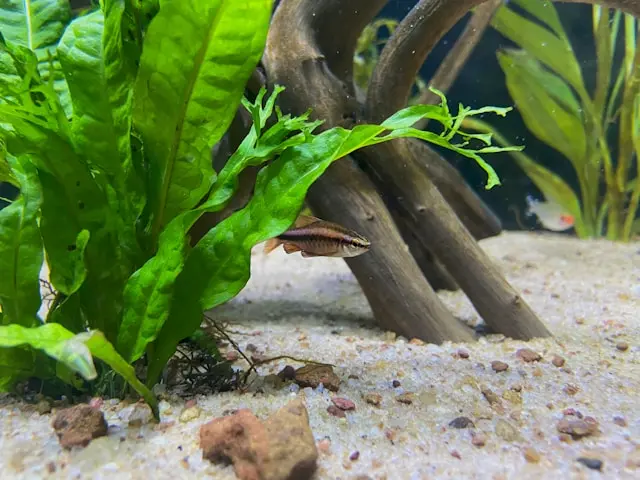
Bogwood and driftwood provide natural shelter and a growing surface for plants like Java Fern.
Prepare the Tank for Specific Fish Species
Research your intended fish species before finalizing the aquarium layout. Different species evolved in different habitats, and their tank environment should reflect those conditions. Mismatched decor causes stress and can prevent natural behaviors like spawning.
Species-Specific Aquarium Requirements
- Annual killifish — require open swimming space that mimics their natural seasonal pools
- Doradid catfish (Striped Raphael catfish) — live in rocky streams and need cave-like hiding structures
- African cichlid Signatus — spawns inside snail shells; include the cleaned shells of large edible snails in the tank
- Tetras and rasboras — prefer densely planted environments with shaded hiding spots
- Bottom dwellers like Corydoras — need smooth substrate to protect their barbels, plus caves for resting
The Signatus cichlid provides an interesting example of species-specific preparation: this small African cichlid exclusively spawns inside empty snail shells. The cleaned shells of large edible snails — the kind sold in gourmet food shops — are ideal and should be placed on the substrate before filling the tank.
For more on selecting species suited to beginners, see our guide on exotic fish for beginners.
Install and Position Aquarium Equipment
Heater Placement
Aquarium heaters work best when positioned toward the back of the tank, where they remain inconspicuous while staying accessible for maintenance. Water must flow freely around the heater to enable convection circulation — warm water rises toward the surface, cools, and sinks back down, distributing heat throughout the aquarium. Blocking this flow creates dangerous hot spots near the heater.
Larger aquariums (55 gallons and above) benefit from two widely spaced thermostatic heaters rather than a single unit. Two heaters provide more even temperature distribution and offer a safety backup if one fails. For detailed heater guidance, see how to use a fish tank heater.
Thermometer Placement
Position the thermometer at the opposite end of the tank from the heater to record the minimum temperature in the aquarium — this reading reflects the coolest water in the system.
LCD thermometers attach to the outside glass and are easy to read but can give false readings from direct sunlight or fingerprints on the glass. Alcohol thermometers attach inside the glass and provide more accurate readings but may be dislodged by large, active fish.
Filter Setup
Aquarium filters perform three functions: mechanical filtration (removing debris), chemical filtration (absorbing dissolved impurities), and biological filtration (housing bacteria that convert ammonia to nitrate through the nitrogen cycle). Choose a filter rated for your tank size — or slightly larger — and position the filter to maximize water circulation throughout the aquarium.
Filter Installation Checklist
- Connect airline tubing from the air pump to the airlift tube on undergravel filters
- Place internal power filters near the water surface, clear of the substrate
- Position filter outputs to create gentle circulation without disturbing substrate
- Ensure water flow reaches all areas of the tank to prevent dead spots
For help choosing the right filtration, see our best aquarium filter guide or learn how to set up a fish tank filter.
Fill the Tank and Activate Equipment
Add Plants Before Water
Live aquarium plants should be planted in the substrate before filling the tank with water. Planting in a dry or partially filled tank is far easier than trying to anchor roots in a full aquarium where buoyancy works against you. Arrange taller stem plants like Vallisneria toward the back, mid-height species like Anubias in the center, and low-growing carpet plants in the foreground.
Secure plants with their roots buried in the substrate but their crowns exposed — burying the crown causes rot. Epiphytic plants like Java Fern and Anubias attach to rocks or driftwood rather than planting in substrate. For low-maintenance options, see our guide on low-light aquarium plants.
Add Water Slowly
Fill the aquarium slowly to avoid disturbing the substrate and displacing decorations. Pour water over a plate, a shallow bowl, or the back of your hand to diffuse the flow and prevent gravel craters. Filling too quickly creates substrate craters that expose the tank bottom and uproot newly planted vegetation.
Treat all tap water with a dechlorinating water conditioner before it enters the tank. Chlorine and chloramine — added to municipal water supplies to kill bacteria — are equally toxic to fish and to the beneficial bacteria colonies your tank needs for biological filtration. Add the conditioner to a bucket of tap water, mix thoroughly, then pour the treated water into the aquarium.
Activate and Verify Equipment
Once the tank is filled, switch on the filter and heater. Verify that all equipment is functioning properly before proceeding.
Equipment Verification Checklist
- Heater indicator light turns on and heater feels warm after 15-20 minutes
- Filter produces visible water flow or air bubbles
- All equipment runs quietly without excessive vibration or rattling
- Temperature reaches the target range and stabilizes within 24 hours

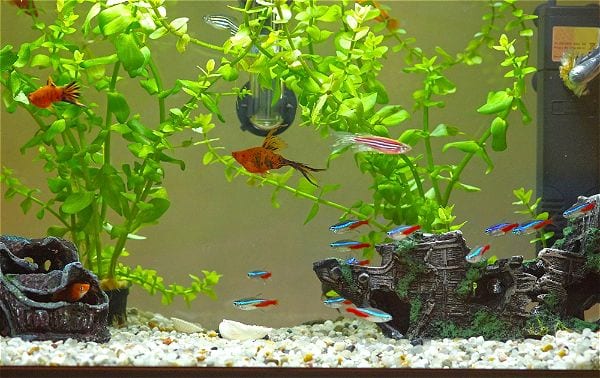
Verify all equipment is running correctly and temperature has stabilized before introducing fish.
Cycle the Tank Before Adding Fish
The nitrogen cycle is the biological process that makes an aquarium safe for fish. Beneficial bacteria colonize the filter media and substrate, converting toxic ammonia (from fish waste and decaying food) into nitrite, then into far less harmful nitrate. Without an established nitrogen cycle, ammonia builds up rapidly and poisons fish — this is the leading cause of fish death in new aquariums, commonly called “new tank syndrome.”
Adding a commercial seed culture of beneficial bacteria to the gravel and filter media jumpstarts the cycling process. These bacterial starter products introduce Nitrosomonas bacteria (which convert ammonia to nitrite) and Nitrobacter bacteria (which convert nitrite to nitrate). The process works whether you use an undergravel filter, a sponge filter, or an internal power filter with biological filter media.
Fishless Cycling
Cycle the tank without fish by adding a pure ammonia source and monitoring levels with a liquid test kit. Fishless cycling establishes the bacterial colony without risking fish health. The full cycle typically takes 4-6 weeks — ammonia spikes first, then nitrite rises as Nitrosomonas bacteria establish, and finally nitrate appears as Nitrobacter bacteria mature. The cycle is complete when both ammonia and nitrite consistently read 0 ppm.
Final Checklist Before Adding Fish
Pre-Fish Checklist
- Temperature stable at the appropriate level for your chosen species
- Water treated with conditioner to remove chlorine and chloramine
- Filter running and producing consistent water flow
- Heater functioning correctly with stable temperature readings
- All decorations secure and unable to shift or topple
- Tank fully cycled: ammonia at 0 ppm, nitrite at 0 ppm, nitrate present
- Test kit on hand for ongoing water monitoring
Proper aquarium preparation creates the foundation for healthy, long-lived fish. The patience invested in thorough substrate preparation, correct equipment placement, and a complete nitrogen cycle pays off in reduced maintenance, fewer disease outbreaks, and a stable environment that supports fish for years. For a complete beginner walkthrough, see our guide on how to set up a small freshwater fish tank, or browse all of our aquarium guides for more setup and maintenance advice.
How long should I wait before adding fish to a new tank?
Wait at least 24-48 hours after setup for equipment to stabilize and water to reach proper temperature. Ideally, cycle the tank for 4-6 weeks before adding fish. Ammonia and nitrite must read zero, with nitrates present, indicating an established nitrogen cycle.
Do I need to rinse new gravel?
Yes, always rinse new gravel thoroughly before adding it to your tank, even if labeled pre-washed. Unwashed gravel contains dust and debris that will cloud your water significantly. Rinse until water runs clear.
How do I know if my tank is cycled?
Test water parameters regularly using a liquid test kit. A cycled tank shows zero ammonia, zero nitrite, and some measurable nitrate. The cycle is complete when beneficial bacteria convert all ammonia through nitrite to nitrate consistently over several days.
Can I use tap water in my aquarium?
Yes, but treat it first with water conditioner to remove chlorine and chloramine, which are toxic to fish. Some tap water may also contain heavy metals or have parameters unsuitable for certain species. Test your tap water to know its baseline pH and hardness.
Why does my new aquarium water look cloudy?
Cloudiness in a new aquarium typically results from unwashed substrate releasing dust or from a bacterial bloom during the nitrogen cycle. Rinse all substrate thoroughly before adding it, and allow the tank to complete its cycle. The water usually clears within a few days to a week.
Found this helpful?
Share this guide with your fellow aquarium enthusiasts!

Written by
FTW Team
The FishTankWorld editorial team brings together experienced aquarists to help you succeed in the hobby.